ShopDreamUp AI ArtDreamUp
Deviation Actions

Literature Text
I will be providing you with a very effective method for creating high quality seamless textures - namely photo realistic patterns. But first, a few notes:


Also notice that the texture is large - this usually eliminates artifacts and standing-out peculiar details.


High Pass radius: 3.0


Part 3: Choosing the correct region for the texture


- Unlike similar methods, this one doesn't use the offset tool. This method aims for quality and requires both full control of the image and a dynamic view of the repeating pattern.
- This tutorial is created for Adobe Photoshop, but can be used with any image editor that has a similar functionality.
- You can click any of the images to see them in higher resolution.
- Prior to tormenting yourself with work, check if the work isn't already done. This is an excellent source of seamless textures.
- A single large-scale image will provide a better result than a repeating pattern in most cases (notable exceptions are vector patterns and computer animations).
Now, let the tutorial begin!
Part 1: Choosing a source image
This part basically defines how much time you will be spending to create the texture and, off course, how good the result will be. The most important advice I have to give is choosing sharp images with a fairly good resolution. 3MP should do, but try to aim higher because you will be using only a part of the original image. The camera angle should be fairly neutral.
Last but not least, aim to choose images with no peculiar details (or else the repeating pattern will always trouble the viewer's eye). A good example for a bad texture would be one of Adobe Photoshop's default textures:
See how the different parts of the texture stand out when repeated? It may be useful in particular cases, but it would trouble me if it is used, let's say, as a background.
The peculiar details can be removed, but why should you trouble yourself? Choose a nice neutral looking picture where nothing stands out and you will get magnificent results. Even complex images can be made into nice seamless textures. Like this here beach footstep texture:
Also notice that the texture is large - this usually eliminates artifacts and standing-out peculiar details.
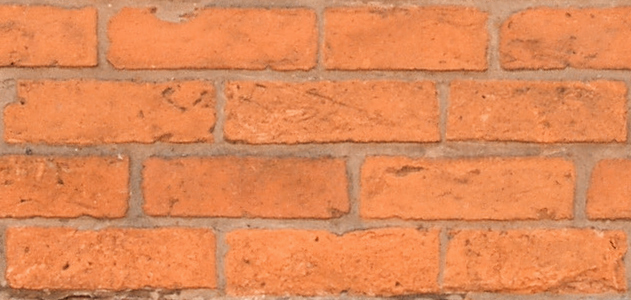
For this tutorial, I chose a simple brick wall photo from this great free texture library (link to the original file):
Part 2: Adjusting the image
Don't hasten to heal the image or remove any copyright text. You won't be using the whole image.
Make whatever adjustments you think are necessary - sharpening, color adjustments and/or filters. For this image some High Pass sharpening should give nice results (and here is a tutorial for this it):
High Pass radius: 3.0
Layer blending style: Soft Light
Next - Hue/Saturation adjustments:
Master hue: +5
Master saturation: -5
Yellow hue: -22
And now the image must be straightened. Guidelines come in handy in situations like this. Luckily, the image is taken from a good angle and a little rotation seems to straighten it. In this reference image I have stroked the guidelines I have used:
Rotation angle: -0.94
Using Photoshop's rulers to set guidelines is very comfortable. Simply put guidelines in different parts of the image to be able to see what transformations yet need to be made. Make sure to remove the guidelines after straightening the image.
Part 3: Choosing the correct region for the texture
This part is crucial. If you get this one right, the rest is a matter of a few minutes. Aim to choose a homogeneous region that will repeat a particular pattern whenever the region itself is repeated as a texture. Make sure there are no peculiar details in the region. If there are any, make sure they are easily removable. When you find such a region do the following:
- Select it very accurately
- Copy the selection into a new layer. If you are using Photoshop, you can use Ctrl + J (or whatever custom shortcut you have set) to do it.
- Make the new layer into a smart object.
- Hide the original layer
- Trim the transparent pixels and increase the canvas size by 200% both vertically and horizontally
- Duplicate the newly created layer thrice
- Create a rectangle using the four new layers by aligning them adjacently
- Now you can see whether the cropped region is suitable for a seamless texture. Look only for approximately good results, details will be polished later
- If you like how the texture aligns, you can delete the layer with the original image as you wouldn't be needing it anymore
When duplicated and aligned:
As you can see, my cropped image makes an acceptable texture, but two of the bricks are darker than the rest and this can spoil the texture. Don't worry about the edges, you simply need to make sure the rest of the texture is looking good.
So after a little work with the Clone Stamp Tool on the smart object everything looks fine:
Why the Clone Stamp Tool? It's extremely fast and comfortable to work with and, in many cases, far more useful than the healing tools. For a more detailed explanation of cleaning up/cloning images see this wonderful article.


I have highlighted the center in the above image so you should know approximately what region to heal.

Yay! It really looks great! But if you look closely, you can still see a few peculiar details that become a little irritating when the image is repeated. So, if you want a truly great result, go back to the Clone Stamp Tool and remove these details from the smart object. Or you can choose not to care. Either way, when finished, define the image as a pattern. That's it, folks!


Part 4: Finalizing the texture
This is the part where the edges start bothering you. Contrary to popular beliefs, fixing them is fairly simple but a little hard to understand. Let's start with the horizontal border:
- To avoid confusion, delete the bottommost two layers
- Create a new empty layer atop the existing ones
- Use the Clone Stamp tool with sampling set to "All Layers" to heal the overall texture without making changes to the original layers
- Duplicate the healing layer and create a clipping mask with it for each of the original layers
- Select all layers and align them to the top left corner. Make sure to do it manually, otherwise the masks will align to the centers of their layers and you will have to reposition them.
- Delete whichever layer in on top. Make sure it's clipping mask is now the clipping mask of the other layer and merge both masks with the layer afterwards.
Here I have highlighted the healing layer for my texture:
Here is a visual representation of the last step:
Repeat the previous steps, but instead of aligning the layers horizontally do it vertically. Converting the new layer into a smart object will not be necessary neither for this nor for the next step.
Now will make sure the corners align well. Make a 2x2 rectangle again and create a new layer to heal the center of the rectangle.
I have highlighted the center in the above image so you should know approximately what region to heal.
After you are done, duplicate the healing layer three times and create a clipping mask for each of the four original layers. Then, similar to the previous steps, align all of the layers in the top left corner. Again, delete the layers and leave only the clipping masks. Then merge the clipping masks.
Now the texture should be ready. Converting the layer into a smart object now will be a good idea. Create a 2x2 rectangle again to see if the texture fits.
Here is my result:
Yay! It really looks great! But if you look closely, you can still see a few peculiar details that become a little irritating when the image is repeated. So, if you want a truly great result, go back to the Clone Stamp Tool and remove these details from the smart object. Or you can choose not to care. Either way, when finished, define the image as a pattern. That's it, folks!
Final version (click on it to go to the download page):
With the finished texture you can achieve magnificent results. Take a look at a texture demonstration sphere:


© 2013 - 2024 IanisVasilev
Comments5
Join the community to add your comment. Already a deviant? Log In
owesome.. thanks ")